3D Point Cloud Annotation
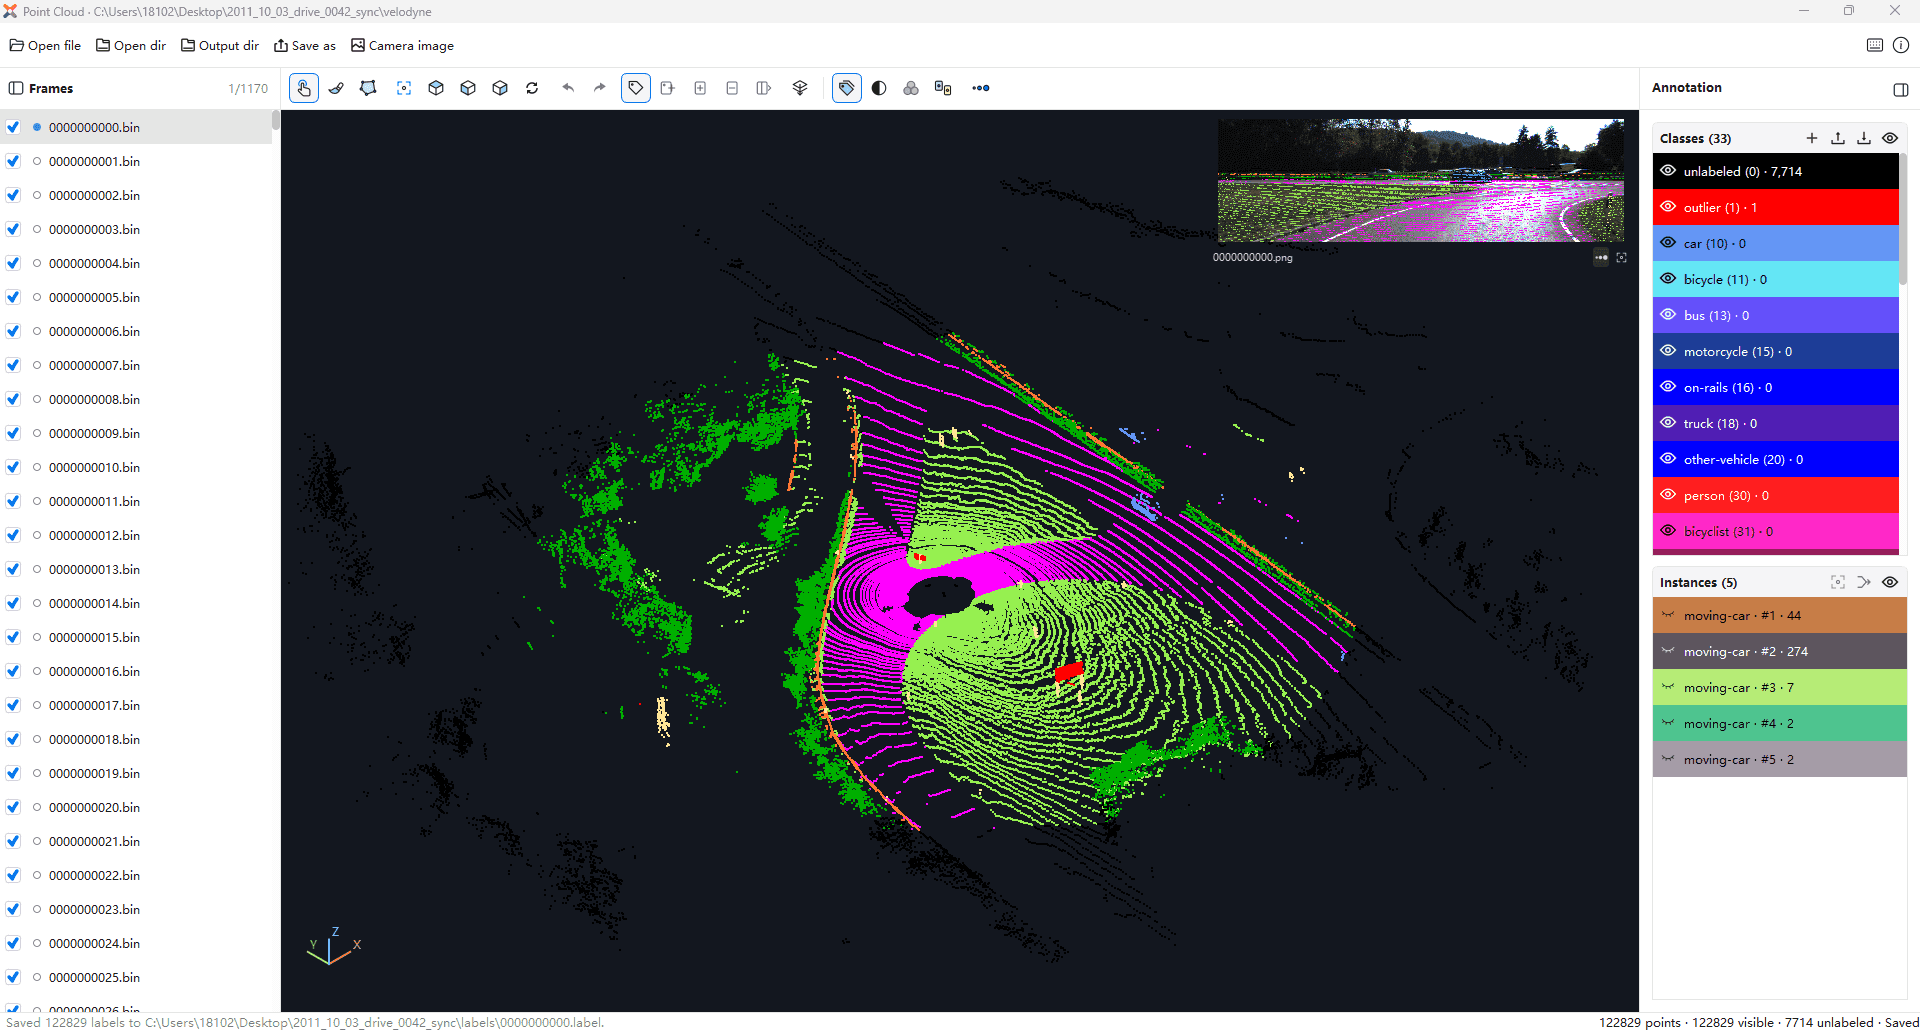
Overview
The X-AnyLabeling point cloud workspace supports per-point semantic and instance annotation. Semantic labels identify classes such as vehicles and roads; instance labels distinguish individual objects within a class. You can edit and review frames, use camera images for reference, and save labels that map directly to the original points.
Prepare your data
The workspace accepts *.bin and *.ply point clouds.
| File | Requirements |
|---|---|
.bin | No header. Each point contains X, Y, Z, and intensity as four little-endian float32 values, totaling 16 bytes. Convert XYZ-only BIN files before importing. |
.ply | PLY 1.0 in ASCII, little-endian binary, or big-endian binary format. The vertex element must include x, y, and z; intensity is optional. RGB coloring requires red, green, and blue properties, all declared as uchar/uint8. List properties are not supported on vertices. |
.label | Optional existing labels: one little-endian uint32 value per point. The number and order of labels must match the point cloud. See “Saving and output” below. |
- Point clouds must not be empty, and coordinates must not contain NaN or infinity.
- Convert other formats, such as PCD, LAS, and LAZ, before importing. Intensity and RGB coloring are available only when the corresponding data is present.
- The workspace requires a working OpenGL display environment. If rendering is unavailable, check your graphics driver and, if applicable, your remote desktop's OpenGL support.
Open a single file or organize a sequence as shown below. The labels and images directories and the two JSON files are optional.
dataset/
├── velodyne/
│   ├── 000000.bin  # or 000000.ply
│   └── 000001.bin  # or 000001.ply
├── labels/
│   ├── 000000.label
│   └── 000001.label
├── images/
│   ├── 000000.png
│   └── 000001.png
├── classes.json
└── calibration.json
Use “Open dir” to select a directory containing BIN/PLY files. If it contains a velodyne subdirectory, that subdirectory is used instead. Files are sorted in natural filename order, so numeric portions are ordered numerically. Other subdirectories are not searched recursively.
“Open file” uses the .label file with the same base name in the point cloud's directory. “Open dir” looks for matching labels both alongside the point clouds and in the dataset's labels directory, and prompts you to choose if multiple matches exist. A configured sequence output directory takes priority. Frames without labels start with all label values set to zero. Import classes.json through “Load classes”; placing it next to the data does not load it automatically.
Quick start
- Click “Point Cloud” (the coordinate axes icon) in the main window's left toolbar. You do not need to load an image first.
- Use “Open file” or “Open dir” to load point clouds. To preserve existing labels, choose a different “Output dir” before editing.
- In the “Classes” panel, click “New class” and enter an ID, name, and color, or import a JSON file with “Load classes”. Select the class you want to annotate.
- Select “Assign semantic”. Press B to paint with the brush, or P to draw a polygon and Enter to finish it. Completing a selection applies the annotation immediately.
- To distinguish individual objects, switch to “Create instance” and select an object you have already assigned to that class. Each completed selection creates a new instance. Use “Add to current instance” to extend an existing one.
- Wait for autosave and check the status at the bottom of the window. Press A/D to move to the previous/next frame. After reviewing a frame, right-click it in the frame list and choose “Mark as reviewed”.
Edits are automatically written to the current label file. Back up existing labels or change the output directory before editing if you need to preserve the originals. “Discard” does not undo changes that have already been autosaved.
Workspace and tools
| Area | Purpose |
|---|---|
| Top file toolbar | Open files or directories, set the sequence output directory, save the current frame to another file, and configure camera images. Keyboard shortcuts and help are on the right. |
| Left frame list | Navigate frames and check label file and review status. A check mark indicates that a label file exists; the circular indicator shows review status. Hover over a frame to see its point cloud and label paths. |
| Central viewport and its toolbar | Inspect the point cloud and choose a selection tool, annotation operation, depth selection mode, and coloring mode. |
| Right Classes and Instances panels | Manage classes, select annotation targets, control visibility, and locate or merge instances. Point counts cover the entire frame. |
| Bottom status bar | Check total and visible point counts, save status, and operation feedback. |
Use the buttons in the side panel headers to collapse the panels, or drag the dividers to resize them. Hover over a tool icon to see its name.
| Tool or action | Usage |
|---|---|
| Browse — V | Drag with the left or middle mouse button to pan, drag with the right button to rotate, and scroll to zoom. |
| Brush — B | Paint with the left mouse button; releasing it applies the current annotation operation. Ctrl+scroll adjusts the brush radius. |
| Polygon — P | Left-click to add vertices. Press Enter, double-click, or click the starting vertex to close the polygon and apply the operation; Esc cancels. While drawing, use Ctrl+left-drag to pan and scroll to zoom. Rotating cancels an unfinished polygon. |
| Fit all points — F | Fit the entire frame in the viewport. Top, Front, and Side view change the viewing direction; Reset view restores the initial direction and fits the cloud. |
| Undo/Redo | Undo or redo point label edits in the current frame. See “Keyboard shortcuts” at the top right for your platform's bindings. Switching frames clears the frame's undo history. |
| Through selection | When off, select only surface points visible from the current viewpoint. When on, select points at all depths within the selection area. Points hidden by display filters are still excluded. |
| Semantic/Intensity/RGB/Instance | Color points by class, intensity, original color, or instance. These modes affect display only. Instance mode dims points that have no instance. |
| Point size | Set the displayed point size from 1 to 10 pixels. This is separate from the brush radius. |
| A/D or PgUp/PgDown | Move to the previous/next frame. First click the point cloud viewport, frame list, or camera view to give it keyboard focus. |
Annotate points
Select a class or instance, choose an operation, then select points with the brush or polygon tool. Changing the tool, class, or annotation operation cancels any unfinished selection.
| Operation | Behavior and requirements |
|---|---|
| Assign semantic | Assign the current class to the selected points. Changing a point's class clears its instance ID; repainting it with the same class preserves the instance. Class 0 clears both semantic and instance labels. |
| Create instance | Create an instance from selected points that already belong to the current nonzero class. Other classes and unlabeled points are excluded. Transferring points from existing instances requires confirmation. |
| Add to current instance | Select the target in the instance list, then select additional points of the same class. Transferring points from other instances requires confirmation. |
| Remove from current instance | Remove selected points from the current instance while retaining their semantic class. |
| Split current instance | Move part of the current instance into a new instance. The selection must include some, but not all, of its points. |
| Merge into current instance | Use Ctrl/Shift to select multiple instances of the same class, then click Merge into current instance. The current row is the target whose ID is retained. |
| Delete instance | Use the delete button on the instance row to clear the instance ID from all its points, retaining their semantic class. |
Double-click a class row to edit its name or color; an existing ID cannot be changed. Removing a class definition also clears that class's semantic and instance labels in the current frame. Label files for other frames are unchanged. ID 0 is reserved for unlabeled points and cannot be removed. Class definition changes are not part of the point label undo history. Labels with undefined class IDs retain their IDs; double-click the corresponding class row to add a definition.
Class checkboxes control class visibility. In the instance list, selecting a row chooses an operation target, while checking a row isolates that instance for display. With the instance visibility switch on, checking one or more instances shows only those instances; clearing all instance checkboxes restores the full view, subject to class visibility. Turning the instance visibility switch off shows only points without an instance. “Locate instance” fits the current instance in the viewport.
Brush and polygon operations exclude hidden points. Deleting an instance, merging instances, or removing a class applies to all affected points in the current frame, including hidden ones. Use polygons for broad regions and a small brush for edges. In dense or occluded scenes, isolate the relevant classes or instances and inspect them from several angles. Use Through selection when you intend to include both front and back layers.
Saving and output
Edits are autosaved after approximately 350 milliseconds of inactivity. The workspace also attempts to save before switching frames or exiting the application; if saving fails, you can choose Save, Discard, or Cancel. Closing the point cloud window only hides it. Reopening it during the same application session restores its current state.
“Output dir” immediately saves the current frame to the selected directory and sets it as the destination for subsequent frames, using matching .label filenames. The directory setting is remembered for the sequence; existing labels are not copied in bulk. If a subsequent frame has no label file in the output directory, the workspace attempts to load its existing labels from the original location, then writes subsequent saves to the output directory. “Save as” changes the destination for the current frame only; further edits in the same session are saved there. Keep the point cloud's base name: labels saved under a different name will not be matched automatically after restarting.
| Output | Contents |
|---|---|
Per-frame .label | No header; one little-endian uint32 per point, or 4 bytes. The lower 16 bits hold the semantic ID and the upper 16 bits hold the instance ID: label = (instance_id << 16) | semantic_id. Semantic ID 0 means unlabeled; instance ID 0 means no instance. Both IDs range from 0 to 65535. |
| Class definitions JSON | Class IDs, names, and colors. Include this file when sharing labels. It contains neither point coordinates nor an instance list. |
Label files always contain labels for every point in the frame, regardless of visibility or filtering. The original BIN/PLY is not modified. Do not reorder, remove, or insert points after annotation, as this breaks the correspondence with the labels. An instance is identified by its class ID and instance ID together; a matching instance ID does not imply the same object across classes or frames.
The default class configuration is <work_directory>/xanylabeling_data/pointcloud/pointcloud_classes.json. If no work directory is specified, the user's home directory is used. Use “Load classes” explicitly when datasets require different class definitions. “Save classes” saves the definitions to another JSON file, which also becomes the destination for subsequent class edits. Importing definitions does not remap existing point labels. In the format below, version must be 1, IDs must be unique and include 0, and colors use #RRGGBB:
{
  "version": 1,
  "classes": [
    {"id": 0, "name": "Unlabeled", "color": "#808080"},
    {"id": 10, "name": "Vehicle", "color": "#6496F5"},
    {"id": 40, "name": "Road", "color": "#FF00FF"}
  ]
}
“Reviewed” status is stored locally, not in the .label file. Marking the current frame as reviewed saves it first. File changes can invalidate the review status. Neither autosave nor the presence of a label file means a frame has been reviewed.
Camera image assistance
Click “Camera image” in the top toolbar and select an image directory. Images are matched to point clouds by filename without the extension: for example, 000000.bin matches 000000.png. PNG, JPEG, and other formats supported by your Qt installation can be used. Subdirectories are not searched. Each image base name must be unique within the directory: 000000.png and 000000.jpg cannot coexist there. A message appears when a frame has no matching image.
Selecting an image directory displays a reference image at the top right. To overlay projected points, also select a Calibration JSON file. Drag with the left mouse button to pan the image and scroll to zoom; double-click or click “Fit image” to fit it to the view. “Projected points” toggles the overlay, which follows the point cloud's colors and visibility filters. The image is for visual reference; you cannot select or edit point labels directly in it.
Calibration uses an X-AnyLabeling-specific JSON format. The same calibration applies to one camera throughout the sequence. All fields below are required; additional fields are rejected.
| Field | Definition |
|---|---|
schema_version | Integer 1. |
image_size | [width, height] in pixels. Both values must be positive integers and match the actual image dimensions. |
camera_model | Must be "pinhole". |
camera_matrix | 3×3 intrinsic matrix: [[fx, 0, cx], [0, fy, cy], [0, 0, 1]]. Focal lengths must be positive; fx, fy, cx, and cy are expressed in pixels. |
T_pointcloud_to_camera | 4×4 rigid transform from point cloud coordinates to the target camera coordinates. The upper block contains rotation R and translation t; the last row is [0, 0, 0, 1]. R must be orthogonal with determinant +1. |
distortion_model | "none" or "opencv5". |
distortion_coefficients | [] for no distortion. For opencv5, exactly [k1, k2, p1, p2, k3]: three radial and two tangential distortion coefficients. |
Matrices are stored as arrays of rows and applied to column vectors: X_camera = R × X_pointcloud + t. Input points use the original coordinates in the point cloud file. In the target camera frame, X points right, Y down, and Z forward. The pixel origin is at the top left, with u increasing to the right and v downward. Translation and point coordinates must use the same length unit. The workspace does not swap axes, convert units, or invert the transform automatically. All matrix entries and distortion coefficients must be finite.
For original, distorted images, supply the corresponding intrinsics, extrinsics, and five distortion coefficients. For undistorted or rectified images, use the intrinsics and camera coordinate frame for the processed images, and set distortion_model to "none"; do not reapply the original distortion. Projection transforms points into camera coordinates, normalizes them, applies distortion, and maps them to pixels using the intrinsics. Points behind the camera or outside the image are excluded. An image size mismatch disables projection while leaving the reference image visible; intrinsics are not rescaled automatically.
The repository includes a matching point cloud, image, and calibration JSON. Open the sample BIN, select assets/pointcloud as the image directory, and load its calibration.json to view the overlay. The calibration below applies only to the camera used for this sample:
{
  "schema_version": 1,
  "image_size": [1241, 376],
  "camera_model": "pinhole",
  "camera_matrix": [
    [718.856, 0.0, 607.1928],
    [0.0, 718.856, 185.2157],
    [0.0, 0.0, 1.0]
  ],
  "T_pointcloud_to_camera": [
    [0.00042768023855836203, -0.9999672484946015, -0.008084491683471012, 0.047953978595318754],
    [-0.007210626507497482, 0.008081198471645075, -0.9999413164503825, -0.0551710332087719],
    [0.9999738645903279, 0.00048594858103900374, -0.007206933692422334, -0.28841710386859104],
    [0.0, 0.0, 0.0, 1.0]
  ],
  "distortion_model": "none",
  "distortion_coefficients": []
}
Currently, only a single camera with fixed calibration is supported. Per-frame extrinsics, fisheye and other distortion models, and direct import of KITTI calibration text files are not supported. You must ensure that images and point clouds correspond to the same frame: matching is by filename, without time synchronization. The overlay is a visual aid and does not determine whether points are occluded by real objects in the image. After restarting the application, select the image directory and calibration file again.